Build scalable, reliable and robust Shopify Webhooks delivery system to your Laravel app using AWS EventBridge. Lower webhooks response times and failure rates. Increase app ratings!
Disclaimer: If your app currently receives webhooks on https endpoint, don’t worry. Setting up Amazon EventBridge is separate process from sending webhooks. In order to start receiving webhooks in EventBridge, you must register EventBridge ARN as webhook destination.
It is assumed that you already have AWS account and Shopify App.
1. Setting up Amazon EventBridge in Shopify app
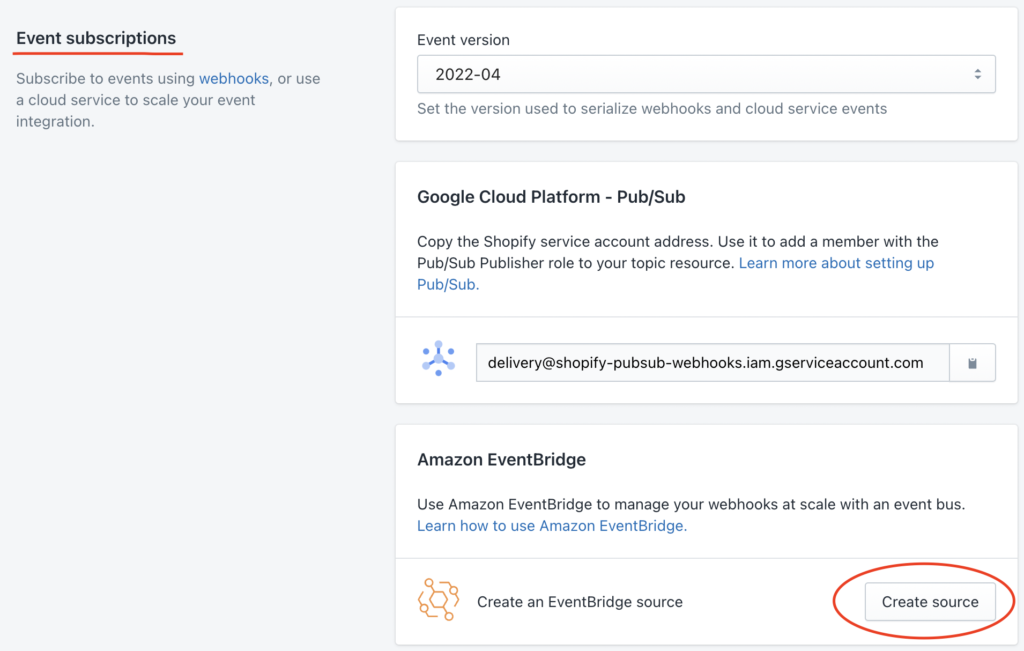
First step of setting up Amazon EventBridge partner integration is done in Shopify. To do it, visit “App Setup” screen for your app in Shopify Partners dashboard https://partners.shopify.com/PARTNER_ID/apps/APP_ID/edit. Find “Event Subscriptions” section and click on “Create source” in Amazon EventBridge card.
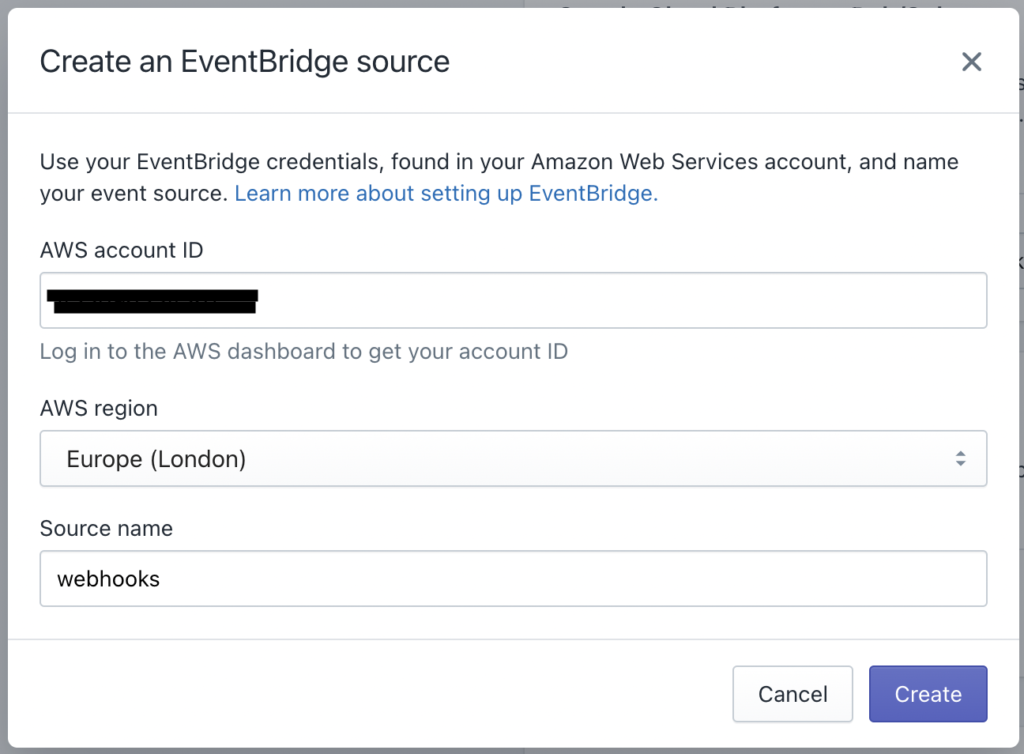
You should be presented with “Create an EventBridge source” modal which lets you setup partner integration for Amazon EventBridge. Firstly, you will need Amazon account id which you can find by logging into your Amazon account and clicking on your account name on the top right. Next, you will need to select region from the dropdown. Lastly, provide “Source name” per your wish.
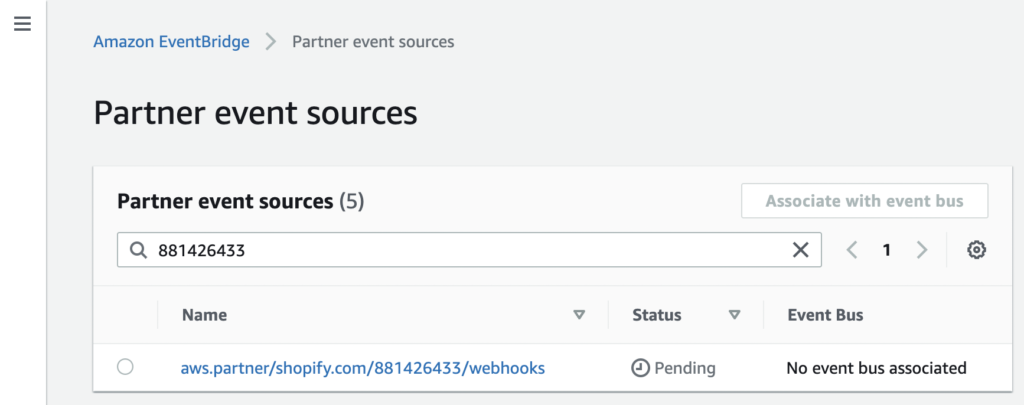
When you click on create, new “Partner event source” will be configured in AWS account. Check it out by going to AWS -> EventBridge -> Select Integration/Partner event sources from the menu. Name will be in the format of aws.partner/shopify.com/SHOPIFY_APP_ID/NAME_YOU_PROVIDED_IN_MODAL
2. Associating event bus
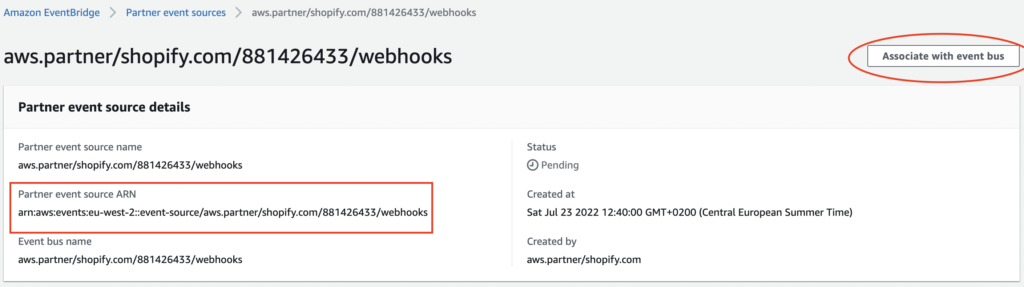
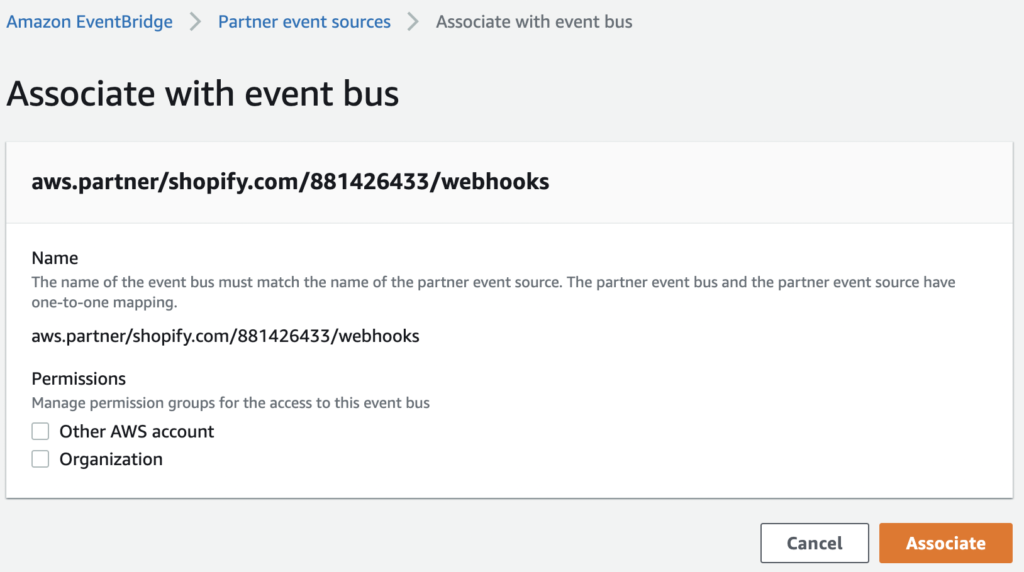
Next thing we need to do is to associate event bus to our Partner event source. You can do that by clicking newly created partner event source and then clicking on “Associate with event bus” button located on top right part of the page. Additionally, one more thing to notice is “Partner event source ARN” which we will be using later on to register the webhooks in Shopify.
After you click on “Associate with event bus” button new screen will open. Only thing you can select there are permission groups. For the sake of this tutorial, we won’t select any of it since we want event bus to stay exclusive only for current AWS account. Proceed by clicking on “Associate” button. That action will create new “Custom event bus” and associate it with partner event source.
You can check newly created Event bus by selecting “Event buses” menu item on the left and find your newly created event bus in “Custom event bus” card.

3. Creating Rule
This step can be done in multiple different ways per your app needs. Here’s the list of some cases that can work for your app:
- Rule to match all events and push them to SQS queue
- Rule to match all events and push them to Lambda
- Rule to match all events and push them to different event bus
- Rule to match some events (let’s say only orders related webhooks) and push them to SQS queue or Lambda
- Rule to match specific event (let’s say GDPR data request) and push it to SNS (or some other AWS service)
We can achieve that by defining custom patterns as describe in https://shopify.dev/apps/webhooks/configuration/eventbridge#define-a-custom-event-pattern. Since we want to keep it as simple as possible for the sake of this tutorial, we will select first option – matching all events and pushing them to SQS queue.
3.1. Defining rule details
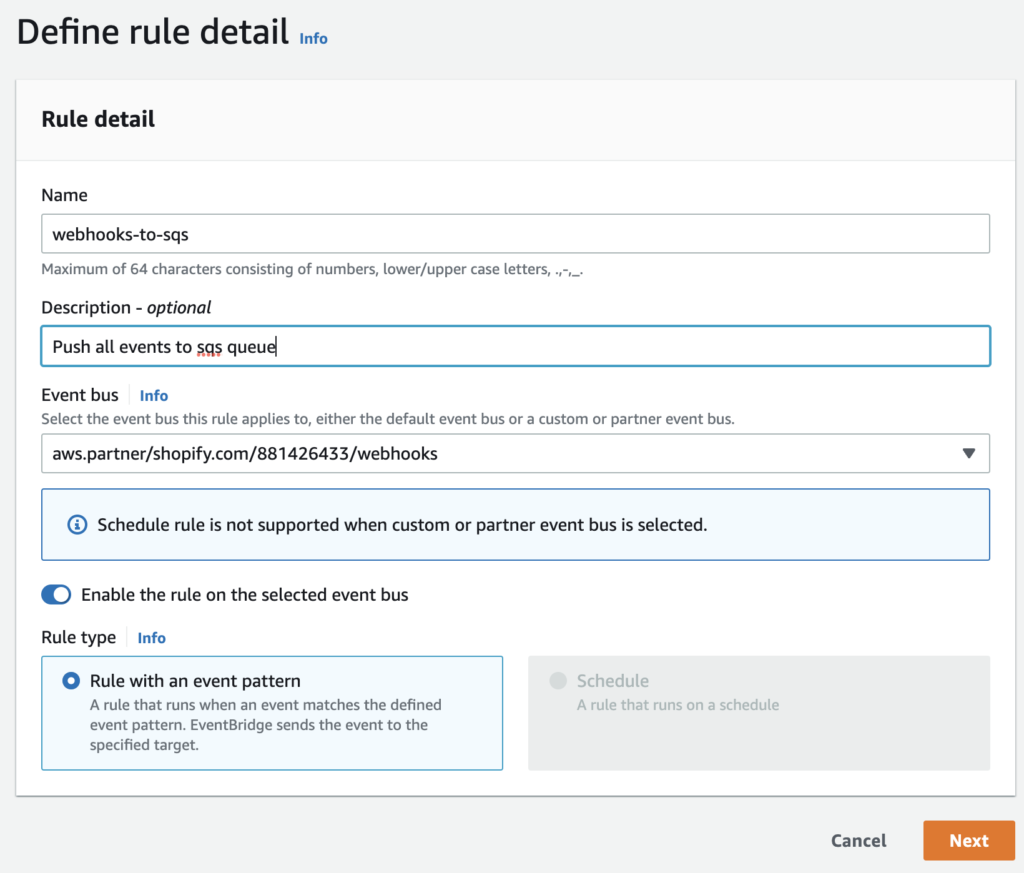
In order to create a new rule, lets select Rules from the left menu, select our event bus and clicking on “Create rule” button.
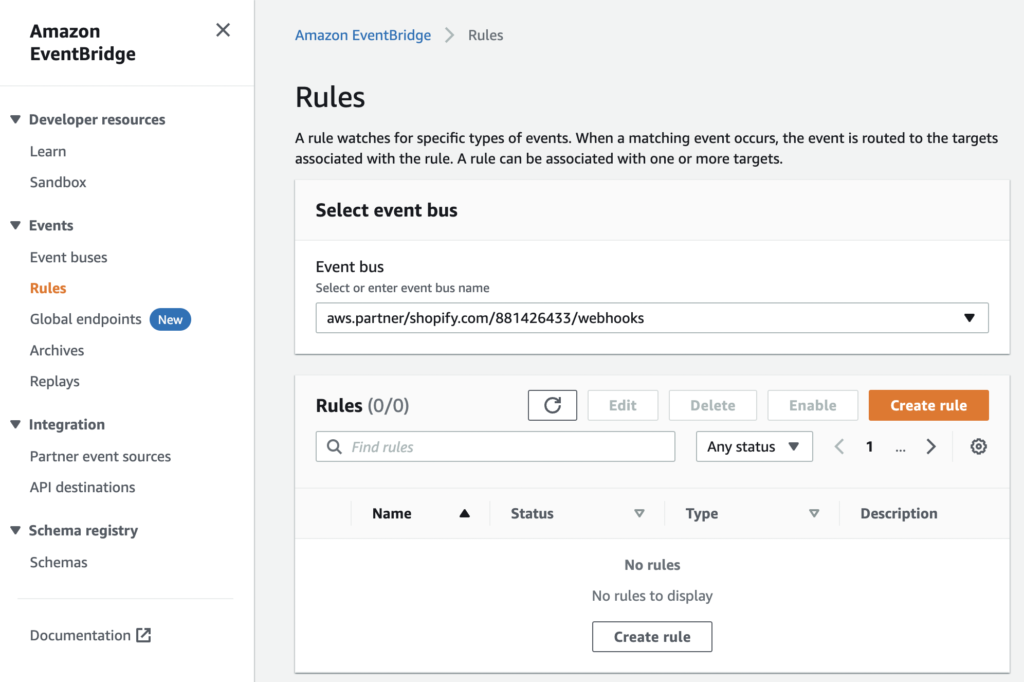
Once new screen opens, first thing we need to define is rule name. Also, we need to select Event bus, but our event bus should already be preselected. Optionally, you can set description per your liking. Then, click on “Next”.
3.2. Defining event pattern
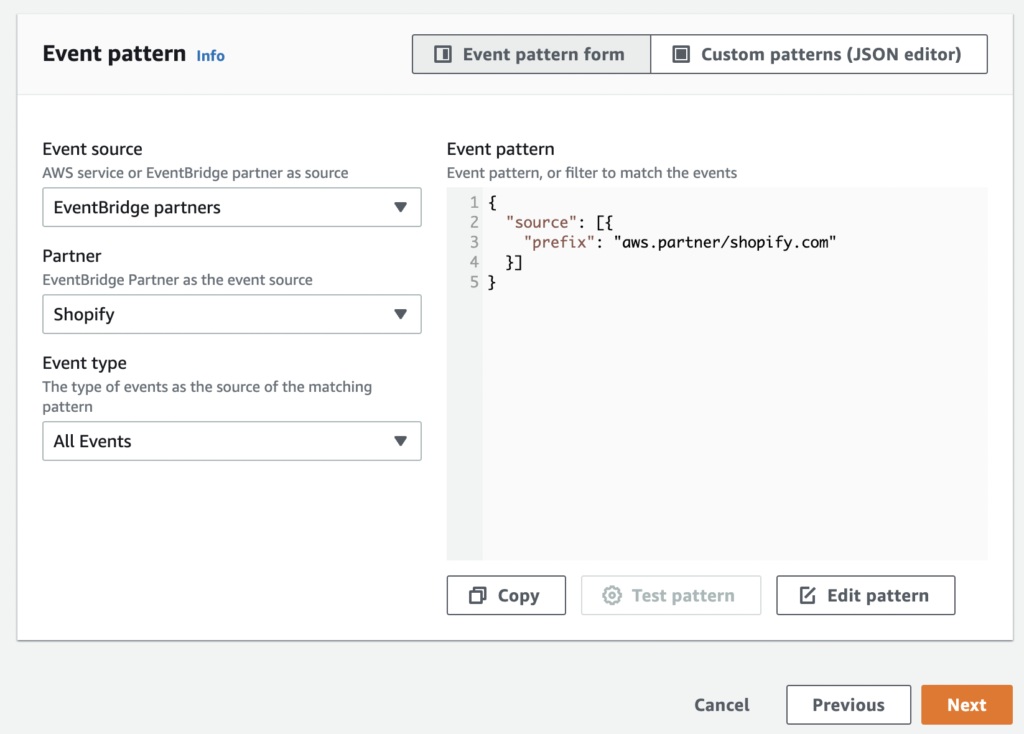
On the next screen, we will be building event pattern. As already mentioned, we will keep it simple and match all events. In the Event pattern dropdown select “EventBridge partners” as Event source, select “Shopify” in Partner dropdown and select “All Events” in Event type dropdown. This will generate new Event pattern on the right side. Keep everything else on default values and click on button “Next”.
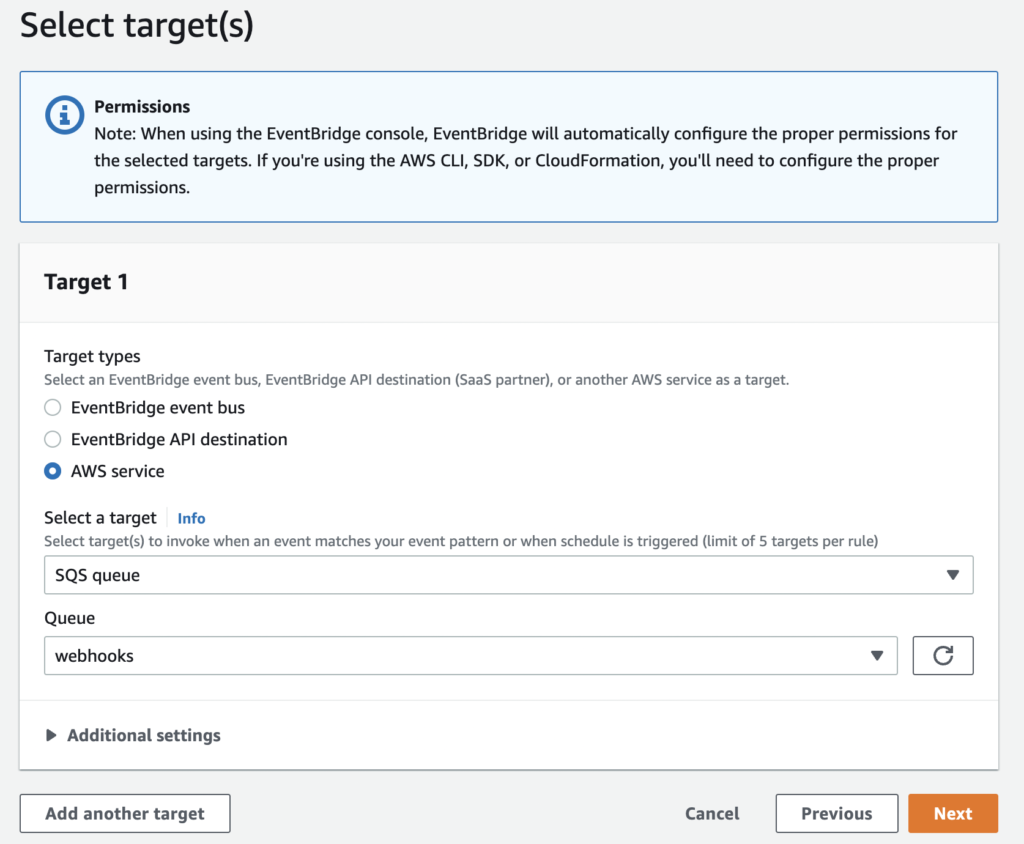
3.3. Defining target
Lastly, we will define the target. Take note that you can define multiple targets for the same rule which can be useful in some situations. For example, when you receive uninstall webhook, you may want to process it in lambda and send notification with SNS. Again, to keep it simple, let’s just push all events to SQS queue.
Prerequisite is to create new SQS queue for these events so we can select it under AWS service target. Head over to SQS (you can do it in new tab) and create new queue. To keep it simple, we will just provide name for it, but you can always configure it per your requirements.
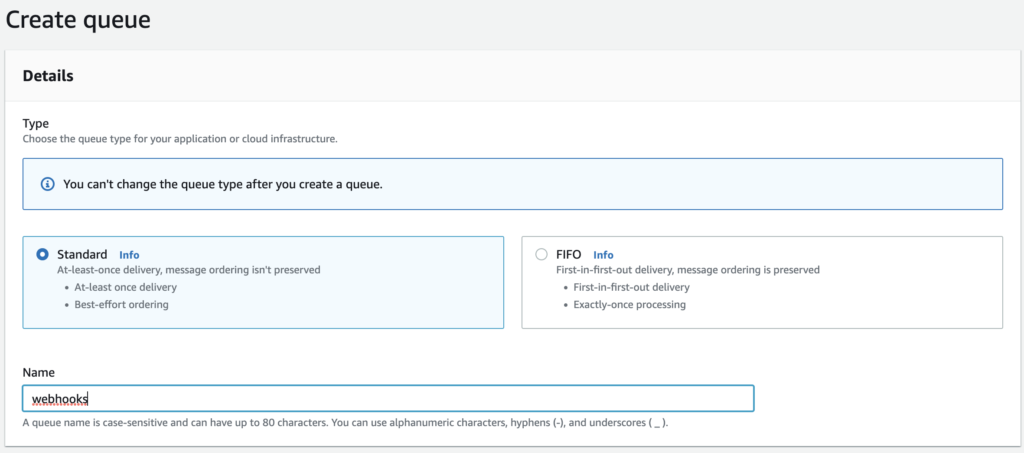
After you head back to rule creation step, proceed by selecting “AWS Service”, then selecting “SQS queue” as target and finally selecting newly created “webooks” queue. Leave additional settings on default values, or play with it per requirements and then click button “Next”.
Optionally, on the next step, you can define tags, but we will skip it in this tutorial. Finally, review all the steps and click on “Create rule”.
Once the rule is done with creation, that effectively means that all events (webhooks) received in event bus will be sent directly to SQS queue.
4. Registering webhooks for Shopify app
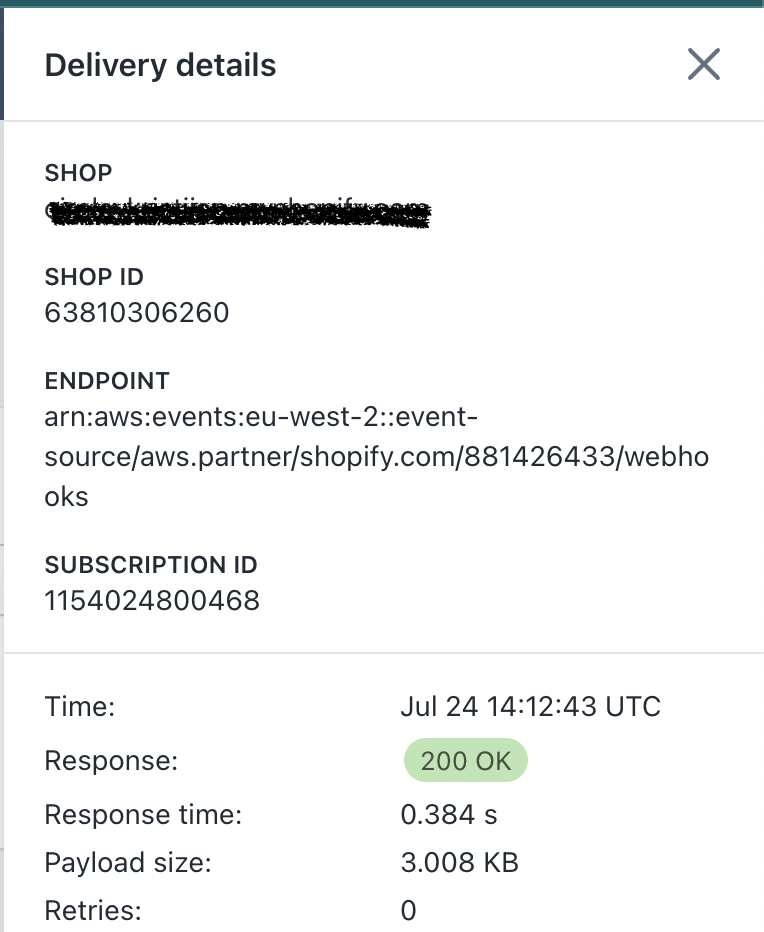
Finally, to actually start receiving webhooks, we must register new webhook by using Shopify API – https://shopify.dev/api/admin-rest/2022-07/resources/webhook#post-webhooks. In this example, we will register “orders/updated” topic with “address” pointing to partner event source ARN we got at step 2 of this tutorial. Here’s the example:
POST https://{SHOP_DOMAIN}/admin/api/2022-07/webhooks.json
{
"webhook":{
"topic":"orders/updated",
"address":"arn:aws:events:eu-west-2::event-source/aws.partner/shopify.com/881426433/webhooks",
"format":"json"
}
}
# Response
{
"webhook": {
"id": 1154024800468,
"address": "arn:aws:events:eu-west-2::event-source/aws.partner/shopify.com/881426433/webhooks",
"topic": "orders/updated",
"created_at": "2022-07-24T10:07:49-04:00",
"updated_at": "2022-07-24T10:07:49-04:00",
"format": "json",
"fields": [],
"metafield_namespaces": [],
"api_version": "2022-04",
"private_metafield_namespaces": []
}
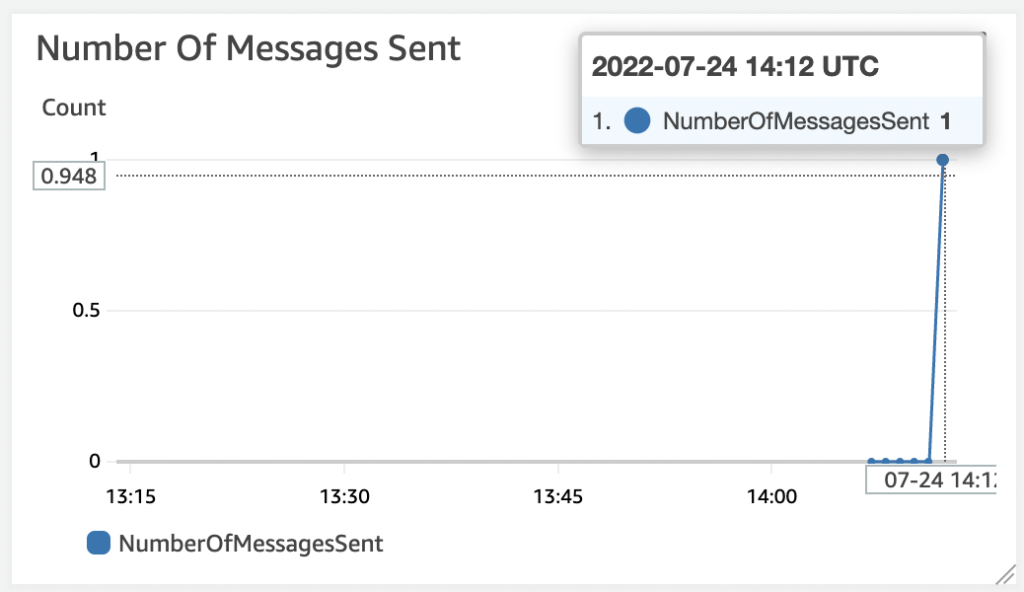
}After updating and order, we will see new message received in SQS.
The implementation part is now on you and your app requirements. We will now take a look at how to receive Shopify webhooks through EventBridge in your Laravel app.
5. Converting messages to Laravel queue jobs
5.1 AWS side
In order to push messages to SQS queue in format of Laravel job, we will need to transform the message to proper format with Lambda and push it to another SQS queue. Finally, we will connect to that SQS queue and start queue worker with php artisan queue:work.
We will repeat the same process for queue creation as in 3.3. with the queue name “webhooks-laravel”.
Next, let’s create new Lambda function. Head over to Lambda and click on “Create function”. Make sure you select a role that has a full access to SQS (polling and pushing messages).

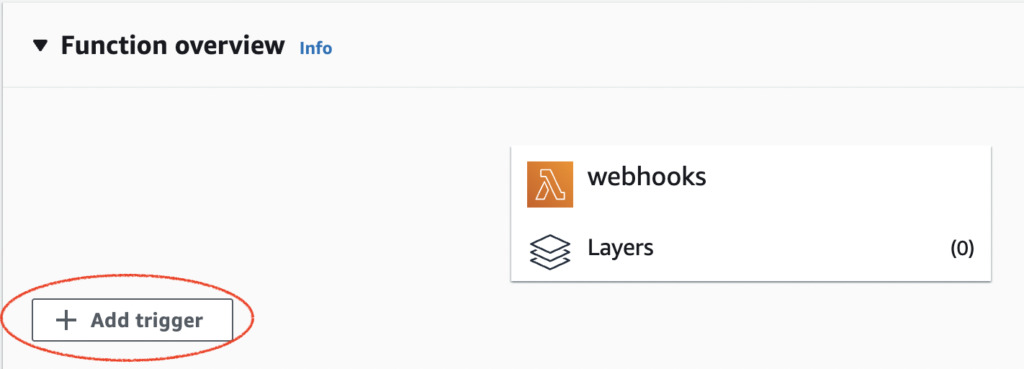
After new function is created, let’s add our “webhooks” queue (the one we initially created which holds all events from event bus) as a trigger. Proceed by clicking on “Add trigger”.
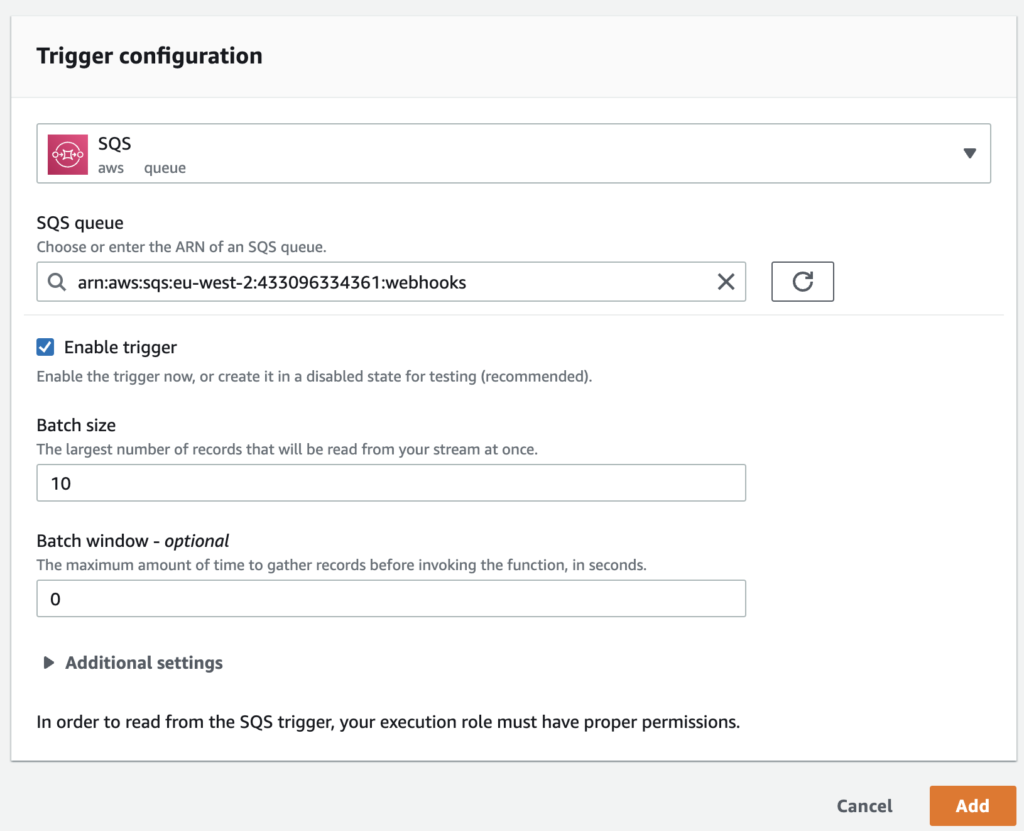
On the next screen, select SQS, chose “webhooks” SQS queue as trigger and check “Enable trigger” checkbox. You can leave batch size as 10 (maximum). That will effectively take 10 by 10 records when there are multiple events in “webhooks” SQS queue. Finish by clicking on “Add” button. Now, all events that lands in “webhooks” SQS queue will trigger this lambda.
Finally, we will need to setup function code which loops through records and pushes them to newly created “webhooks-laravel’ SQS queue. You can take a look at example payload that Shopify sends here: https://shopify.dev/apps/webhooks/configuration/eventbridge#eventbridge-payload-structure. You can find lambda code here: https://github.com/ksimenic/aws-shopfiy-webhooks-eventbridge-to-laravel.
const AWS = require('aws-sdk');
AWS.config.update({region: 'eu-west-2'});
const sqs = new AWS.SQS();

const destinationQueueUrl = "https://sqs.eu-west-2.amazonaws.com/XXXXXXXXXXXX/webhooks-laravel";
const jobName = "App\\Jobs\\HandleShopifyWebhook";

exports.handler = async (event, context, callback) => {

    await Promise.all(event.Records.map(async (record) => {

        const { body, eventSourceARN } = record;

        const data = JSON.parse(body);

        const shop_domain = data.detail.metadata['X-Shopify-Shop-Domain'];
        const webhook_topic = data.detail.metadata['X-Shopify-Topic'];
        const detail_buffer = Buffer.from(JSON.stringify(data.detail), 'utf-8');
        var full_details = detail_buffer.toString('base64');

        const job_details = {
            displayName: jobName,
            job: "Illuminate\\Queue\\CallQueuedHandler@call",
            maxTries: null,
            timeout: null,
            timeoutAt: null,
            data: {
                commandName: jobName,
                command: "O:" + jobName.length + ":\"" + jobName + "\":10:{s:14:\"\u0000*\u0000shop_domain\";s:" + shop_domain.length + ":\"" + shop_domain + "\";s:16:\"\u0000*\u0000webhook_topic\";s:" + webhook_topic.length + ":\"" + webhook_topic + "\";s:15:\"\u0000*\u0000full_details\";s:" + full_details.length + ":\"" + full_details + "\";s:6:\"\u0000*\u0000job\";N;s:10:\"connection\";N;s:5:\"queue\";N;s:15:\"chainConnection\";N;s:10:\"chainQueue\";N;s:5:\"delay\";N;s:7:\"chained\";a:0:{}}"
            }
        };

        var sqsMessageParams = {
            MessageBody: JSON.stringify(job_details),
            QueueUrl: destinationQueueUrl
        };


        await sqs.sendMessage(sqsMessageParams).promise().catch(err => {
            console.log(`Webhook EB | ERROR: ${err}`);
        });

    }));
};
In short, we are looping through records (remember batch size 10) and, in the loop, we are parsing the body of each message, extracting shop domain, webhook topic and full details which we additionally JSON and base64 encode. After we extract and prepare all the data we need, we proceed by creating job_details (this is how Laravel jobs look inside the queue), then we prepare SQS message with job details as MessageBoy and “webhook-laravel” QueueUrl (destination queue) and finally we send message to “webhooks-laravel” queue. Once this lambda finishes processing, we will have new “HandleShopifyWebhook” job in the queue.
5.2. Laravel side
On the Laravel side, we need to define the “HandleShopifyWebhook” job. Here’s simple example of the job. Take note of json_decode(base64_decode()) part which we need since we did the encoding in Lambda.
<?php

namespace App\Jobs;

use Illuminate\Bus\Queueable;
use Illuminate\Queue\SerializesModels;
use Illuminate\Queue\InteractsWithQueue;
use Illuminate\Contracts\Queue\ShouldQueue;
use Illuminate\Foundation\Bus\Dispatchable;
use Illuminate\Support\Facades\Log;

class HandleShopifyWebhook implements ShouldQueue
{
    use Dispatchable, InteractsWithQueue, Queueable, SerializesModels;

    protected string $shop_domain;
    protected string $webhook_topic;
    protected string $full_details;

    public function __construct(
        string $shop_domain,
        string $webhook_topic,
        string $full_details
    ) {
        $this->shop_domain = $shop_domain;
        $this->webhook_topic = $webhook_topic;
        $this->full_details = $full_details;
    }

    public function handle(): void
    {
        Log::info('Data', [
            $this->shop_domain,
            $this->webhook_topic,
            json_decode(base64_decode($this->full_details), true),
        ]);
    }
}
Lastly, we need to configure Laravel to use SQS as queue connection. We will need to setup following .env vars. There’s extensive guide on how to setup SQS queue on following tutorial – https://dev.to/ichtrojan/configuring-laravel-queues-with-aws-sqs-3f0n.
AWS_ACCESS_KEY_ID=AK****
AWS_SECRET_ACCESS_KEY=z5****
AWS_DEFAULT_REGION=eu-west-2
SQS_PREFIX=https://sqs.eu-west-2.amazonaws.com/XXXXXXXXXXXX
SQS_QUEUE=webhooks-laravel
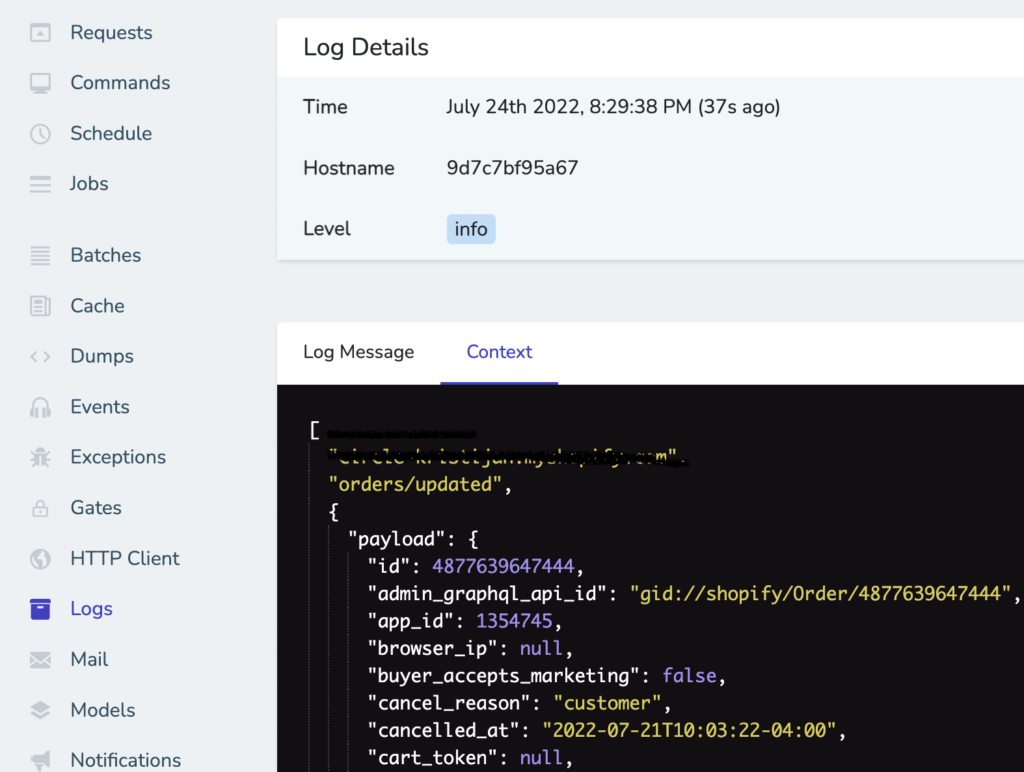
QUEUE_CONNECTION=sqsOnly thing left to do is to run php artisan queue:work. After running it and updating the order, we can see the logs in telescope.

Congratulations, you have successfully processed Shopify webhooks using Amazon EventBridge in your Laravel app.
If you want to level up your apps and your codebase, check out other posts on our blog xdoo.hr.
Do you need help with setting up Shopify webhooks using EventBridge in Laravel app?
For anything related to Shopify or Laravel development send us your inquiry to [email protected]!
Leave a Reply